21 Nov 5 Great Pilates Exercises for Low Back Pain
A single Pilates workout can sometimes improve back pain in the same way that a massage can bring relief to tight muscles. But for more lasting results and to prevent future flare-ups, it is recommended to get in two or three Pilates workouts per week. Give yourself at least four to six weeks to feel the results. Note that these workouts don’t have to be grueling hour-long sessions at a studio or physical therapy office. Even a short series of simple exercises and stretches, done consistently, can create lasting improvement. Once you begin to practice Pilates, you will automatically begin to implement healthier movement patterns into your daily activities such as unloading groceries from the car or picking up a toddler. Pilates increases awareness of proper spinal alignment and good posture, so if you feel yourself starting to slump, hunch, or dip into one hip, you can correct it at the moment. In short, Pilates will help you fix the problem (harmful movement patterns) while also relieving the symptoms (back pain and discomfort). Here are some of our 5 favorite Pilates exercises for your back:
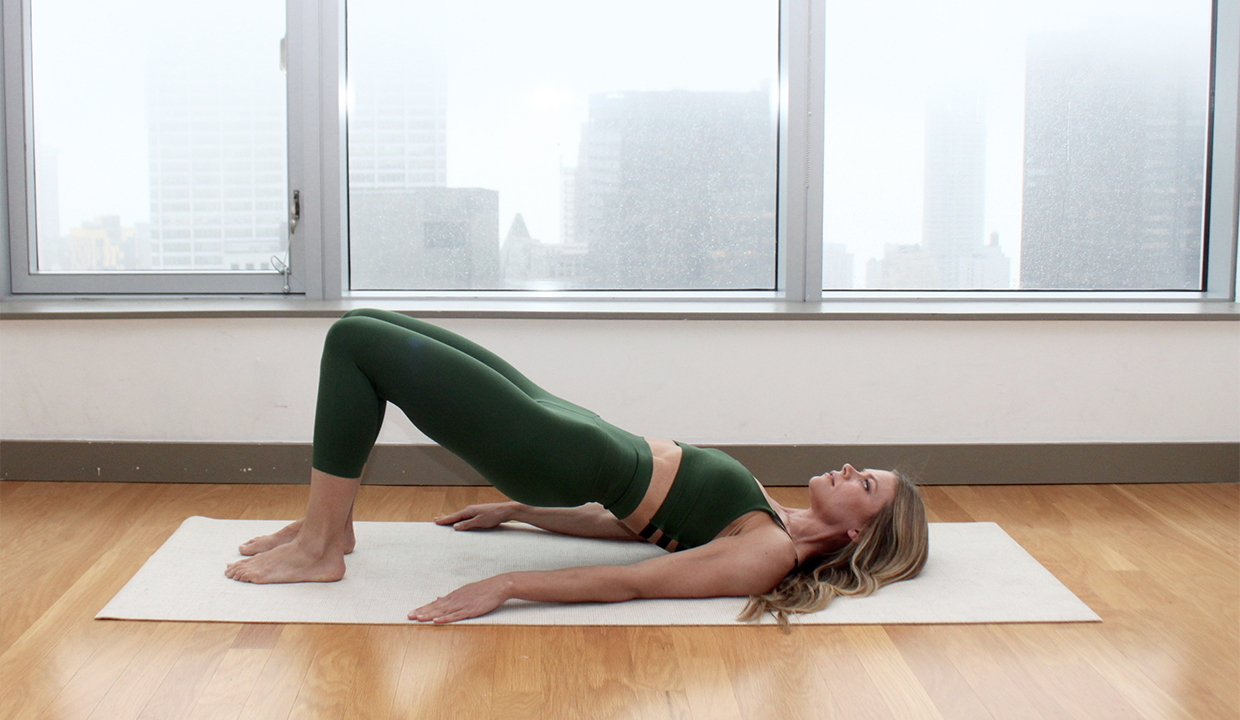
Bridge
We like to incorporate this exercise into classes early on in the piece as it has a lot of dimensions in place. Firstly, by getting a sense of your pelvic positioning in being aware of how movement forces you to work strong lower limb musculature in unison. Specifically, getting gluteals and hamstrings to work in strengthening and stabilizing capacity. A segmental bridge is a classic Pilates exercise in which it retrains global muscle activation and mobilizes the lumbar and thoracic spine.
The movement: Lying on your back with bent knees shoulder-width apart, cross your arms across your chest. Thinking about tightening your gluteal muscles as you begin to gently tilt your pelvis towards you. In the same movement, start to slowly lift your backside off the ground. Once you safely bring bone by bone in order (your thoracic spine) you stop at the top of the movement as you are resting on your shoulder blades. To lower, draw your breastbone downwards towards the floor; continue to peel your spine back onto the floor bone by bone until the tailbone connects the mat.
Progressions (to focus on further stability of lower limb musculature): You may add a theraband around both legs (just above the knee) or place a rolled-up towel between your knees (a good amount of pressure through the towel).
Roll Down
A roll down in pilates is an excellent warm-up and warm down exercise. It challenges postural muscles, increases proprioception (body awareness of movement), and retraining the order in which movement should occur. Furthermore, a roll down allows you to focus your mind and to gain a good sense of turning your core muscles on. A roll down has similar properties to the popular gym exercise known as the roman extension. Our teachers often ask people to demonstrate a roman extension where they will simply bend at the hips. By adding in a roll down as a warm-up activity, they can get a true sense of utilizing the whole spine and to decrease the pressure placed on the lumbar spine.
The movement: Standing with feet shoulder-width apart, have both arms out in front to start with (think of making your hands heavy). Stand up tall, with good posture. Starting at the neck, slowly start to curve each segment in order as you progress towards the ground through your thoracic spine. If you are restricted by tight hamstring muscles, just bend your knees ever so slightly to be able to touch the ground with your fingers. Inhale at the bottom, then as you exhale reverse the movement (keep the hands out in front and heavy) and slowly ‘stack’ your lumbar, thoracic and cervical spine until you come up tall into standing.
Progressions (to challenge your balance and core further): Start in tandem stance (left leg in front of right BUT widen your stance to maintain balance). Alternate sides. Also, in the fully flexed position, you can place hands underneath toes to stretch out your hamstrings and neural tightness.
Oblique Supine
With a more stretch-orientated approach to this exercise, our teachers like to introduce this exercise to people who partake in a lot of rotation exercises such as swimming or throwing sports. The premise of this exercise is to engage your core as you safely rotate your thoracic spine. In turn, this will turn on your oblique muscles and help you to twist further. Let me tell you right now that it saved my cricketing season after all of those (slow-)medium pace deliveries!
The movement: Lying on your back with a rolled-up towel in between bent knees (ankles remain on the ground), have your right arm directly out to the side. Inhale, and then as you exhale, tighten the towel between your knees and slowly drop both legs out to the left-hand side. Hold at this end position to stretch out your side, and then come back up to your starting point. Reverse the hand position to the left-hand side and then drop knees out to the right. Maintain the stretch for 20 seconds.
Progressions (to increase the stretch): Have one ankle off the ground (in tabletop position)
Breaststroke Preparation
Breaststroke preparation is a different exercise in comparison to the aforementioned movements as it is performed in prone (on your stomach). Crucially here, do not start with this exercise when you are cold or not warmed up properly as it can stress the lumbar spine. The idea of this exercise is to progress your deep neck flexors against gravity as well as increasing your awareness of your postural muscles being recruited.
The movement: Begin on your stomach whilst resting your forehead on a folded towel. Ensure the back of your neck is elongated. Your arms should be resting by your side. Your legs need to be straight, hip-distance apart. To initiate the movement, slide the shoulder blades gently downwards and reach from the shoulder blades to the fingertips towards the feet and allow the arms to hover 2 inches off the ground. Simultaneously lengthen the upper body to hover the breastbone 1 inch off the ground. Slowly come back down to the starting point.
Progressions (to increase multifidus strength): Introduce leg movements coming off the ground in sync with the chest movement.
Clams
Clams are a very useful exercise to strengthen the gluteal muscles and to improve the timing of muscle activation around the hip. Furthermore, rotary control of the pelvis is emphasized. To put a real-world term onto this last point, clams help your walking as proper gluteal control is required to control pelvis rotation, therefore activating your glutes is necessary to act as a stable base to work off.
The movement: Lying on your side (pick any side to start- it is important to perform this exercise both sides). Place your underside arm outstretched in alignment with the trunk with a rolled-up towel between your ear and your shoulder. Start with your hips bent up to 45 degrees and knees bent to 90 degrees. Shoulders and hips should be stacked on top of one another. Once in this position, gently draw your sitting bones together to engage your glute muscles. Lift your top knee upwards with your ankles rolling on top of one another. Lower the top knee onto the bottom leg. After repeating this exercise, you should feel the muscle working close to your backside. Repeat to fatigue and then change sides. It’s a good idea to perform a glute stretch after fatiguing this muscle.
Progressions: Use a theraband to work the glutes against resistance. Have your ankles in the air to further challenge the glutes (ensure you are performing the level 1 efficiently before you progress).
These 5 exercises are a good introduction to get into our core work without exacerbating your lumbar spine condition. They are gentle to start with, but still a really good combination of stretching and strengthening the core and lower limb musculature. By progressing through these exercises and adding in the aforementioned progressions where appropriate, the stress on your lumbar spine will be reduced and you will start to activate your core a lot better. As always, if you are feeling significant pain with any of these exercises, stop and review the literature. We encourage stretching first, and then come back to it once you have reviewed your technique. As well as this, your physiotherapist can help to let you know any actions that may need modifying or when to progress.